Pages

Showing posts with label diy. Show all posts

Wednesday, September 17, 2014

A kitchen update


The finished kitchen!
Covering up the ugly wallpaper.  I just tiled over it.
 The "before" picture- check out the valance and wallpaper...
Hubby and I have been improving the rv.  It is amazing how much some paint can change a space.  The wallpaper in the rv was hideous!  I completely painted the kitchen- cabinets and walls.  I found this awesome thin peely tile at Home Depot and used it for the backsplash.  The kitchen is teeny tiny so a small change makes a huge impact!  What do you all think?

Friday, September 12, 2014

A Leaky Roof

(This is the leak on the seam on the roof... no bueno!)
(Not knowing what to do while it was still raining, I put a tarp down with all my pots and pans to collect the water)

When we bought the rv, we knew it was a fixer upper.  We DIDNT know the roof in the bedroom leaks horribly!  I came home from work one day to find the bed soaked from the rain.  We put a tarp over the roof to prevent any further leaks until we could fix the roof.  We dont have the ability or the funds to take the rv into the shop whenever theres an issue, so we set out to learn how to do it ourselves.  The rv store gave us some sealant that will hopefully fix our problems.  I bought enough to do the whole roof and we just had to wait until hubby had time to go up on the roof.  I am not going up.  No way.  No how.  Hubby was amazing and sealed the whole roof in the scorching sun.  We haven't had a leak yet so he did well!
(can you see hubby up there?)

Monday, July 15, 2013

DIY Dog Food Bowl Chairs

We have two big dogs who eat a lot! They each have their own bowl and space in the kitchen. Sounds good right? Only problem is that the bowls "travel" through the kitchen when Whiskey pushes them making sure all the food has been devoured. I am constantly tripping or kicking the bowls and was extremely frustrated. I tried feeding them in other rooms, but the bowls still got under foot. So I turned to Pinterest to solve the problem. I bought two mismatched chairs from Craigslist for $10. I painted them yellow to match the other accents in the house. While Hubby was at work, I got out his jigsaw and cut holes in each of the chair's seats. I had to keep cutting as my hole had to be big enough for the food bowls. I realized a bit too late that I should have done all this outside, as my living room was then covered in a thin layer of dust. Oh well, now I know for next time. Each dog now has a specific "chair bowl" as we had to shorten the legs on Whiskey's chair. It took them a few meals to get used to the new eating areas but now they know exactly where to go. I love how their bowls look right at home in the house, even if they do look like "potty chairs" as one of my Aunts commented...


Tuesday, July 2, 2013

Using What You Got- In the Basement

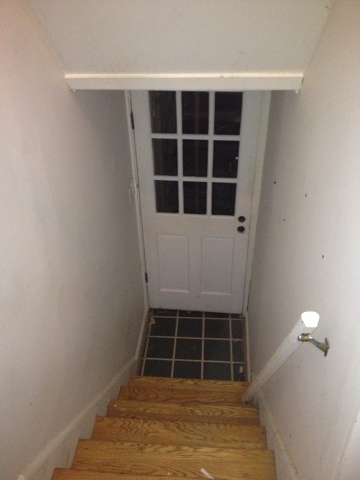
As you may already know, last year our basement flooded and we had to rip everything out down to the studs.  We are waiting until we can save up enough to fix it, so for now we are just living with it as is.  We use it mainly for storage since we don't have a garage.  Our house is a split level house, so as soon as you walk in the front door you can go up or down.  Until now we didn't have a door to separate the downstairs, so as soon as you walked in you could smell the basement-y smell.  It didn't smell horrible but it did smell basement-y.  And when you looked down the steps you could see the hot mess we call our basement.  I had contacted a couple contractors to see if they could put up a new door, but bids were crazy high.  We had saved the doors from the bedrooms (which we had replaced with french doors) and I was hopeful they would work.  They ended up being too small and I was resigning myself to just live with the basement no-door situation.  Until I remembered we had an antique door as a decor item in the spare bedroom. Guess what?  It just happened to be the perfect size.  The. Perfect. Size!  Hubby installed it and I just need to add a doorknob.  For now we can pull it open without a knob.  So we solved our door problem without spending a dime.  Its amazing what you find when you actually take the time to look!  We still have to pull up the vinyl flooring directly at the bottom of the stairs, but as of right now its looking a world better. 

Sunday, June 30, 2013

Using What You Got- In the Yard

Hubby and I have really been working on sprucing up our property.  We realize that our house needs some major curb appeal, and I mean major!  Our mailbox was pretty shabby looking, the lawn was way too long (since our mower quit), the "plants" err weeds were taking over the flower beds and the place wasn't looking too hot in general.  We are trying to fix it up while spending as little as possible.  I have been taking a mental inventory of what we have laying around that we could actually put to use.  One item that really stood out was this garden gate.  This gate has been well loved.  I originally bought it on craigslist from a lady who was redoing their fencing.  We used it as a planter backdrop, a decoration and even a headboard.  Today thanks to Hubby, it is proudly serving once again as a functioning garden gate!  We still have to add fencing on the other side, but now it divides the parking area and the steps leading to the backyard.  We only had to buy a new gate latch (which we haven't put on yet) but otherwise we didn't have to spend any money on it.  We have a couple more gates we plan on putting to use in the garden and goat pen.